
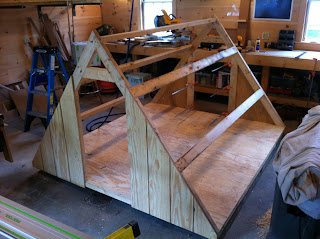
I recently completed the pig's new shelter for when they are relocated onto pasture. I knew that I wanted to build a simple A-frame for them, so I looked around online and found some plans from an extension service from the 60s. This is a very classic design. The only difference is that the plans called for doors, but I decided not to add them because it just doesn't seem necessary. My pigs won't be around in the winter and if at some point I do keep pigs over winter, they probably wont be out on pasture anyway. This is simply the pig's summer home.

My goal was to build the house as inexpensively as possible and to use as many free/recycled materials as I could find. At first I thought it was going to be difficult to get what I needed for free since its all dimensional lumber and sheet goods, but it worked out pretty well. After a somewhat awkward conversation with the lumberyard manager at Littleton Lumber, they took me around back and forklifted down a huge stack of 2x4s and 2x6s for me. They were all recycled and had lots of nail holes and some staples in them. And they were pretty twisted and checked, but there were a lot of long lengths, a bunch of 16' and 12'ers. So I said thank you very much and took the whole stack.

I had 5 sheets of Texture 1-11 plywood which were left over from some project. I found them in the garage and I have no idea how they got there. Texture 1-11 is plywood that somewhat resembles barn boards. Its kind of hokey stuff, but it was free and for this purpose it actually was perfect. It looks nicer than normal exterior plywood at least.
I was really happy with how efficiently I was able to use my materials. I used all 5 sheets of the texture 1-11, with very little scrap left over. The triangularly shaped sections in the pic above were all cut out from one 8' long strip. The only materials that I ended up buying were:
(2) pressure treated 4x4s (for skids)
(2) 4x8 sheets 3/4" exterior grade plywood (for the floor)
(1) galvanized steel ridge roll
screws, glue, and paint
All together, I don't think I spent more than $150.


All the framing I did with drywall screws and then I attached the plywood to the frame with glue and nails (using my new finish nailer). I found this glue that Titebond makes called Interior/Exterior Wood Construction Adhesive which I really liked. You apply it with a caulk gun so its great for these projects when you need to get a lot of glue on quickly.

I took an old can of paint from when the barn was re-painted and got it cloned so the pig house matches all the outbuildings.

I drilled through the skids and installed a loop of chain with 1/2" hex bolts so that the house can quickly be hooked up to the tractor. The house will be moving every month or so with the pigs as they are rotated through the pasture.

And here it is, all the way out at the end of the field! I can't wait to get the pigs out there. I will be setting up the fencing tomorrow, so hopefully I'll be moving the pigs in a few days.
I wonder how it all worked out, did the house survive and did the pigs like it and use it? Very impressive construction!
ReplyDelete