Tuesday, May 31, 2011

Readying the Field

This last week has been pretty brutally hot, sunny and humid - it's summer time! It feels good to be dirty and sweaty after so many months of staring out at the field waiting.

At the same time, I'm realizing that I should have worked a little harder to get myself in shape this winter.    We laid down black plastic mulch the other day over the bottom 6 rows in the garden. That's where we're planning on planting the tomatoes, pepper and eggplants, and the black plastic warms up the soil and suppresses weeds. After a full day of bending, standing and squatting my legs were screaming.

The black lines along the rows are drip tape, part of the irrigation system we bought at Brookdale Farm in New Hampshire. Each row has a line of tape that will slowly drip water throughout the day. They all connect at the end of the rows to a main line that we'll run down the side of the field and will hook up to a garden hose. This system uses much less water than hand watering would and will save us a lot of time  and effort.

Rolling out the plastic mulch
We dug a trench and buried it on either side of the row


Notice the drip tape lines going under the plastic
Finished!
Meanwhile, our tomato, pepper and eggplants are hardening off outside, getting ready to be planted tomorrow. We'll just cut a hole through the plastic and put them in the ground. It's good they're going in the ground, they've gotten really big. 


Thursday, May 26, 2011

Hooray, we have a field!


It took two days but the fields are all laid out and we're going to start planting tomorrow!


We made 30 inch rows  (so we can work in them and step over them easily) and 16 inch walkways (16" because that was the size of our biggest rake). The rows curve with the topography of the land because there's a pretty significant slope and we want to catch as much water as possible as it flows downhill. If the rows were straight, a lot of water would just collect in the paths and flow down into the wet area in the middle of the field, but this way the water will collect against the beds and filter slowly through. 


We used a couple different methods for raking the dirt, everyone had their favorite ways to do it, but basically we laid out the 30 inch beds using a homemade "scribing tool" (basically a couple of stakes drilled onto a piece of wood 30" apart)


and then we proceeded to alternate between raking up the dirt on either side and raking it down the middle to create pathways. It was pretty exhausting dirty work, but also very satisfying, the garden is finally coming together and it's so nice to be outside in the sun! We all got sunburnt. 

In a couple of the walkways we put down cardboard and straw to keep down the weeds and create a path. The cardboard we've been getting from supermarket produce boxes and from a bike shop in Concord (bikes come in big cardboard boxes). It's going to be pretty hard to collect enough cardboard to put down on these rows, however, so we're going to plant some in clover instead.  


Our Aerial Shot: from on top of the lumber racks on the back of Dave's pickup


The bottom corner is going to become one big triangular bed, probably for cucumbers. 

It's been a long couple of days but we can finally start planting!


New House for the Pigs

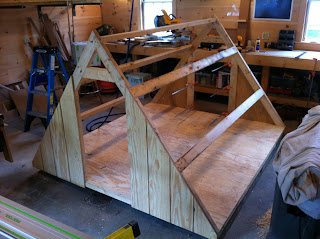
I recently completed the pig's new shelter for when they are relocated onto pasture. I knew that I wanted to build a simple A-frame for them, so I looked around online and found some plans from an extension service from the 60s. This is a very classic design. The only difference is that the plans called for doors, but I decided not to add them because it just doesn't seem necessary. My pigs won't be around in the winter and if at some point I do keep pigs over winter, they probably wont be out on pasture anyway. This is simply the pig's summer home.


My goal was to build the house as inexpensively as possible and to use as many free/recycled materials as I could find. At first I thought it was going to be difficult to get what I needed for free since its all dimensional lumber and sheet goods, but it worked out pretty well. After a somewhat awkward conversation with the lumberyard manager at Littleton Lumber, they took me around back and forklifted down a huge stack of 2x4s and 2x6s for me. They were all recycled and had lots of nail holes and some staples in them. And they were pretty twisted and checked, but there were a lot of long lengths, a bunch of 16' and 12'ers. So I said thank you very much and took the whole stack.


I had 5 sheets of Texture 1-11 plywood which were left over from some project. I found them in the garage and I have no idea how they got there. Texture 1-11 is plywood that somewhat resembles barn boards. Its kind of hokey stuff, but it was free and for this purpose it actually was perfect. It looks nicer than normal exterior plywood at least.


I was really happy with how efficiently I was able to use my materials. I used all 5 sheets of the texture 1-11, with very little scrap left over. The triangularly shaped sections in the pic above were all cut out from one 8' long strip. The only materials that I ended up buying were:

(2) pressure treated 4x4s (for skids)
(2) 4x8 sheets 3/4" exterior grade plywood (for the floor)
(1) galvanized steel ridge roll
screws, glue, and paint

All together, I don't think I spent more than $150.


All the framing I did with drywall screws and then I attached the plywood to the frame with glue and nails (using my new finish nailer). I found this glue that Titebond makes called Interior/Exterior Wood Construction Adhesive which I really liked. You apply it with a caulk gun so its great for these projects when you need to get a lot of glue on quickly.


I took an old can of paint from when the barn was re-painted and got it cloned so the pig house matches all the outbuildings.


I drilled through the skids and installed a loop of chain with 1/2" hex bolts so that the house can quickly be hooked up to the tractor. The house will be moving every month or so with the pigs as they are rotated through the pasture.


And here it is, all the way out at the end of the field! I can't wait to get the pigs out there. I will be setting up the fencing tomorrow, so hopefully I'll be moving the pigs in a few days.

Tuesday, May 24, 2011

Wendell Berry Passage

"Eric Gill sees in this industrial dismemberment of labor a crucial distinction between making and doing, and he describes 'the degradation of the mind' that is the result of the shift from making to doing. This degradation of the mind cannot, of course, be without consequences. One obvious consequence is the degradation of products. When workers' minds are degraded by loss of responsibility for what is being made, they cannot use judgment; they have no use for their critical faculties; they have no occasions for the exercise of workmanship, of workmanly pride. And the consumer is degraded by loss of opportunity for qualitative choice. This is why we must now buy our clothes and immediately re-sew the buttons; it is why our expensive purchases quickly become junk.


With industrialization has come a general depreciation of work. As the pice of work has gone up, the value of it has gone down, until it is now so depressed that people simply do not want to do it anymore. We can say without exaggeration that the present national ambition of the United States is unemployment. People live for quitting time, for weekends, for vacations and for retirement; moreover, this ambition seems to be classless, as true in the executive suites as on the assembly lines. One works not because the work is necessary, valuable, useful to a desirable end, or because one loves to do it, but only to be able to quit - a condition that a saner time would regard as infernal, a condemnation. This is explained, of course, by the dullness of the work, by the loss of responsibility for, or credit for, or knowledge of the thing made. What can be the status of the working small farmer in a nation whose motto is a sigh of relief: "Thank God it's Friday"?


But there is an even more important consequence: By the dismemberment of work, by the degradation of our minds as workers, we are denied our highest calling, for, as Gill says, 'every man is called to give love to the work of his hands. Every man is called to be an artist' (Gill, A Holy Condition of Working). The small family farm is one of the last places - they are getting rarer every day - where men and women (and girls and boys, too) can answer that call to be an artist, to learn to give love to the work of their hands. It is one of the last places where the maker - and some farmers sill do talk about 'making the crops' - is responsible, from start to finish, for the thing made. This certainly has a spiritual value, but it is not for that reason an impractical or uneconomic one. In fact, from the exercise of this responsibility, this giving of love to the work of the hands, the farmer, the farm, the consumer, and the nation all stand to gain in the most practical was: They gain the means of life, the goodness of food, and the longevity and dependability of the sources of food, both natural and cultural. The proper answer to the spiritual calling becomes, in turn, the proper fulfillment of physical need."


-- Wendell Berry, A Defense of the Family Farm


Saturday, May 21, 2011

Rainy Week

Those of you who live in the Massachusetts area can probably empathize with me when I say that this past week has been the absolute worst.

We woke up on Monday morning and realized almost immediately that there was no way we were going to be able to perform the final till on Wednesday, it was cold, rainy and dreary and - according to the weather report - there was no end in sight. Naturally, this realization was followed by a couple hours of moping, finger-pointing and rock-kicking. Why hadn't we paid attention to the weather report and tilled on Friday when it was still sunny and dry? What were we going to do all week in the mud and the rain? Was our summer harvest ruined by one poor decision? Was it a poor decision? What was worse, to till too soon and face the weeds or to be planting our field at the very end of May? And what to do with all those crazy two month old tomato plants overrunning the greenhouse????

Well I'm writing now to say, we did it! We slogged through the muddy, rainy week and now we're pulling ourselves out the other side alive and well (except for a couple of chickens - but that's a story for another post). We planted some more in the kitchen garden, did some Spring cleaning, built a shelter for the pigs and got the tomato plants outside where they're hardening off. Now we're glued to the weather report  hoping it's going to dry out in the next couple of days so we can get our fields up and running and our transplants in the ground. Who knows if we made the "right" decision, or if there even is a "right" decision, but we're forging ahead.

And as the weather improves, so do our moods. I see sun so I've got to get outside, but here are some pictures. 


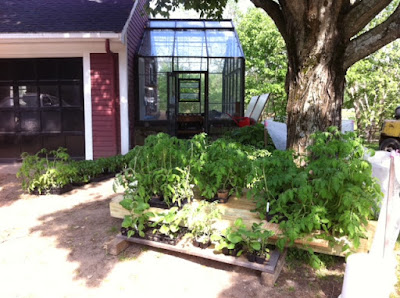
We're using a couple empty raised beds to keep tomato plants outside. We have wire hoops ready if we need to tarp them against the cold at night.

Flower transplants

Building the pig shelter


Friday, May 13, 2011

Fencing Plot

Here is the plot I made for our electric fencing. I measured all the distances with a 200' tape measure and marked trees that I could use as posts with orange tape as I went. Then, I overlaid this plan onto an existing map of the property that I have.


I forgot to put on the map that the size of the small field is 100'x50'. I sent this into Wellscroft and I'm waiting to hear back on a quote.

Berries

The days are getting busier and busier. i can't believe we're only one week from planting the fields! In the meantime, we've been planting the kitchen garden and putting in berry patches. We ordered 12 raspberries plants, 6 blackberry plants and about 60 strawberry plants. They all came dormant and bare-rooted, wrapped in plastic. The raspberry and blackberry plants basically looked like little sticks with roots on them.

It's nice to have a reason to be happy about rainy, cloudy days this spring. It's much better for the plants  to transfer them when it's wet and overcast. Luckily, Tuesday morning, when Mom and I planted the berry patch, was pretty gloomy. First, we measured out a spot for them between the drive way and the tilled fields. Our berry patch is 24' x 9'. We have 3 rows of raspberries 6' apart (4 plants each) and 2 rows of blackberries (3 plants each). Each plant is 3' apart. We planted them right into the ground, surrounding each bush/stick with a couple good shovel-fulls of compost. Next, we took cardboard and covered the ground all around the plants to smother the grass and weeds. Mom's been going to a bike shop and picking up cardboard boxes for the last couple of months, so we have a lot of big cardboard boxes saved up in the garage. We laid down compost around the rows of plants and wood-chips (free, from some tree guys that were chipping logs up the street) down on the paths.

Cardboard, compost and chips

Then we planted the strawberry plants in the compost between the blackberry and raspberries bushes. 

We've since had to put up temporary fencing around the perimeter to keep the dogs from chewing on the blackberry and raspberry sticks/bushes.

Unfortunately we probably won't get any strawberries this year but we should have raspberries and blackberries by the fall! We have also planted 10 blueberry bushes in the wet area between our two fields. 

Zen Moment:


Tuesday, May 10, 2011

There's more than one way to fence a pig

Hello, blog readers. This is my first blog post ever. Gallagher has been threatening to rescind my ability to post for months, but I finally did it! Hopefully, I will get used to this and be a regular contributor in the future.

On Saturday I went to a fencing clinic at Wellscroft Farm in southern New Hampshire. There they operate both a working livestock farm and and a fencing company called Wellscroft Fencing Systems. They are very nice, very helpful, and extremely knowledgeable people. The owner, David Kennard, in addition to being a full time farmer and boarder collie breeder/trainer, is also the self-proclaimed "Portable Net Fencing KING of New England." It was a great clinic and I learned A LOT about fencing in one day.

When I told people I was going to an electric fencing clinic 1 1/2 hours away from the farm, the reactions were somewhat mixed. Most people were supportive, but some basically said, "why would you need to go to a clinic?" I am an electrician after all (albeit not a licensed one), and therefore the assumption is that I should be able to hook a stupid wire up to a fence and not electrocute myself too badly in the process. How hard could it be? This is somewhat true. The answer is that I did not go to the clinic to learn how a fence energizer works, or what the difference between voltage and amperage is. I luckily already understand these concepts. What makes fencing complicated and worth learning about, for me, is that there are so many different options and variations, so many ways to do it. And believe me, its very confusing and frustrating to design a fencing system if you have no experience with it. My reason for going to the clinic was to determine the best, most efficient (both in terms of work and cost) method for fencing my pigs and specifically what equipment I would need. I figured it would be easy one stop shopping. I'd sit and listen to a little sales pitch, ask some questions, and buy what I needed.


The clinic was surprisingly well attended—around 100 people showed up at 8:30 for coffee and donuts, followed by a fast paced talk by David Kennard on the basics of electric fencing. In 2 ½ hours he covered how fence energizers work, the different types of energizers (AC, battery, solar), grounding techniques, lightning protection, monitoring voltage and troubleshooting, training animals to the fence, different types of electric fencing (permanent, semi-permanent, and portable), and much more.


A few things that I took away from this talk:

  • Energizer all have the same basic internal components in that they all run off DC (direct current, e.g. batteries) power. The AC (alternating current, e.g. an outlet in your home) models simply have a rectifier built in and the solar models are simply DC battery powered units that have solar panels attached to to them. Many of the models can run off of AC or DC right out of the box. If you want to run it off a battery, you just need to buy a 12v deep cycle marine or regular car battery. If you want to run it solar, you need to buy a battery and a solar panel.

  • Animals need to be trained to the fence. The best way to do this is to set up the electric fence inside of an existing permanent fence or pen. Then you bait the fence leaving some grain or other food right on the other side of it. Once the animal gets a shock they will not test it again. It is especially important with pigs to train them with a wooden or wire fence behind the electric fence because pigs, unlike other animals, will often charge through the electric fence the first time they get a shock.

  • Grounding is extremely important. If your fence, clogged with weeds and grass, is a better ground than your actual ground rod, then you have a problem. The fence must be clean and you need at least one 4' long galvanized steel ground rod driven, preferably into damp soil. The wetter the better. You can even ground straight into a pond if you have one nearby. Additional ground rods can be added as needed, but must be 10' apart. And finally, all ground rods for your fence must me more than 30' from your utility ground, or you will get electrical interference on your 120v system.

  • If you need to ground a portable system quickly, and don't want to drive a rod 4' into the ground, you can take a section of fence or of wire mesh, attach your ground wire to it, and then just throw it down flat on the grass. Just make sure not to touch it once the system is on.

After the talk, we took a tour of the farm and David showed us all of the different types of fencing in action. This was extremely helpful because it became more and more clear how beneficial electric fencing can be when it is set up extensively as a system to control the entire farm. David talked a lot about rotational grazing and how he has designed his fencing system with this model in mind. Rotational grazing is so important in any sustainable livestock model, and portable fencing is what makes it possible, both in terms of cost and labor, for small and large producers alike.

Intensive rotational grazing (IRG) is a pasture management technique that results in highly efficient usage of pasture as forage as well as restoration of nutrients to the soil and an increased biomass. Grazing animals are confined to a section of pasture for a brief period of time (the area and time are dependent on the type and number of grazers) while the other sections of pasture are allowed to rest. The idea is to find the right ratio of grazers to pasture size so that the forage is consumed at an even rate and the manure is evenly spread. If you put 5 pigs on an acre of land, then they are going to poop in one spot, eat some grass here and there, root up some spots here, and maybe not even touch some areas. But if you take those pigs and you put them in a 1/4 acre or even smaller, then they will start to graze, root, and spread their manure more evenly.

After the pasture is exhausted (but not destroyed), the animals are moved to another section and the previous section is allowed to recover. The animals are provided with unlimited fresh forage. The manure begins to break down and seep into the soil proving it with nutrients necessary to regrow. And if the timing is right, this process keeps going on and on. Its really a beautiful thing.

This system work with any ruminants or non-ruminants that can get a portion of their diet from forage. And it works especially well when you bring more than one type of animal into play. One of my favorite farmers, Joel Salatin, is the master of finding ways to achieve symbiosis on the farm, to have everything play its part and in doing so create a closed loop. After his cows have exhausted a section of pasture, they move on to another and he moves his laying hens onto the grazed down land. The laying hens forage for whatever is left and also pick apart the fresh cow patties looking for the insects that are already hatching inside them. This breaks the manure down so it can leech into the field more efficiently.


pigs enclosed in a small paddock using pig netting

For our 4 pigs, we have about an acre of pasture and probably 1 1/2 acres of woods. The plan that I have come up with after attending the clinic is to surround the entire area with a perimeter fence and then use net fencing specifically designed for pigs to segment it off into paddocks. The perimeter fence could and probably should be permanent fencing, ideally high tensile wire, but I don't have the money for that. So I am going to install a semi-permanent fence using 2-3 strands of poly rope and I am going to run it through the woods using as many trees as possible as posts. The perimeter fence will run through the woods and then across the back of the pasture, through another section of woods and then back along the tree line, creating a big U shape. I will then use one or two lines of pig netting to create a narrow slice containing pasture and woods that will be about ¼ acre total. The best thing about creating the perimeter fence is that it becomes my power source. I can put the energizer at the beginning of the fence, which is close enough to an outlet to run it off AC, and then it will run all the way out though the woods to the far end of the field. So, when I set up my pig netting, all I need to do is clip it onto the perimeter fence and it is ready to go. I will post a map of the fencing plan soon.


We are considering using electric fencing for the vegetable fields as well. We need to keep both small critters and deer out, so the plan is to use a 30” tall garden netting for the critters and then run 2 strands of electric tape above it to keep out deer. Small animals will not dig under electric fencing like they will under conventional wire fences because their first instinct is to test the fence before digging. Since I am already buying the fence energizer for the pigs, the cost of buying the fencing for the garden will certainly be cheaper than putting in a permanent fence and it comes with the added benefit of being able to take it down in the fall if we need to plow again.

Piglet Videos

Welcome Home Piglets!

Well, I'm happy to report that the doxycycline seems to be doing it's job and this week is promising to be much better than the last one.

Just in time too, because we had four little piglets waiting for us in New Hampshire. Yesterday morning Dave put the finishing touches on our piglet pen, we packed a couple sandwiches (and some of Becca Chapman's famous oatmeal walnut pecan cookies), threw a couple of old large dog crates in the back of the truck and prepared to make the trip north.


I made their bed for them

Dave's Pig Trough

This pen used to belong to Wilbur, the Vietnamese Pot-bellied pig. But since he's decided he's more comfortable in the barn, it seemed like the perfect place to keep our piggies for the first couple weeks that they're here before we're ready to put them out to pasture.

After a beautiful two hour drive we arrived in Bath, NH, home to Clinton and his pig farm. We've emailed back and forth with a number of different potential piglet sellers in the last couple of months, some much closer to us than Northern New Hampshire, but Clinton had impressed us both with his knowledge and his love of pigs. His barn contains tons of mama pigs and their litters, and they all seem very happy and healthy. Clinton was honest, straight-forward and full of information. In addition, the piglets that we received had already been wormed and castrated, and were guaranteed not to die (he promised to replace them if they did).

Clinton's Pig Farm


Clinton allowed us to pick from a couple of different litters. We quickly identified which litter was our favorite, and decided to take all our piglets from that one mama. It's okay to mix litters, but the pigs will often squabble at first, and we just liked the idea of keeping the brothers and sisters together so they would be more comfortable when we got them home. We picked out two matching red boys with black snouts, a white boy with a brown face and spot, and one little feisty girl with a white stripe across her back. We ruled out another larger girl because her tail was hanging straight and loose, which is often a sign that a pig isn't feeling very well. Clinton picked them up one at a time by their back legs, trying to avoid the mama who apparently has a mean streak and is extra protective of her piglets, and loaded them into our dog crates. We had filled them with lots of hay to keep the piglets cozy and comfortable, and wrapped a tarp over the top to keep them out of the wind.


We checked on them once at a gas station on the way home and they seemed very comfortable and happy. Once we got them home, we placed them one by one in their new bed and watched as they rooted around in the hay for a little while and then stepped out to explore and dig around in their new pig pen.


In Other News:

The fence has been put up around the kitchen garden, so now we can start really planting the raised beds in earnest.


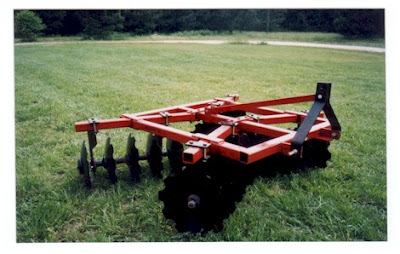
Dave also harrowed the field on Sunday, so all the big sod clumps are broken up and buried. Only one more week (to let the sod really break down underground) and we can start planting!

Disc Harrow: dragged behind a tractor, it cuts through strips of sod and breaks up the soil

Coming Soon: Piglet videos!

Meanwhile...